Do you have any questions concerning iversity?
Please do not hesitate to contact us if you have any questions about the platform and send us a message:
Frequently asked questions
Can I sign up for iversity even though I do not work, study, or teach at a university?
Yes. For those who are interested in collaborative work and knowledge transfer but are not affiliated with a university, there is the option of choosing the user category 'administration/other' when registering. However, if you work at a research institute or are active in research in any other way, please register as lecturer/researcher.
How do I give students access to my course?
If a course, group or conference is set as Closed or Private, it is only accessible via an invitation code. Provide your students with the invitation code of the course. You can see the link on the main page of your course in the right-hand side column. The course code is also automatically shown on the course’s handout which you may distribute to your class. Your students, upon registering on iversity, will be able to easily find your course on the platform.
Alternatively, after setting up a course you will find a box called actions on the right side of your screen. Click on the option recommend course and enter the e-mail addresses of your students in order to invite them. You can add a personal message, so they know what that invitation is about.
Is it possible to add a second lecturer to a course (group/conference)?
Yes. Go to edit course and choose one or more additional admins by typing their names. It is only possible to choose people who are already members of the group/course or users who have confirmed your contact requests.
You can choose whether they are displayed as assistants, admins, or not at all on the main page of the course/group.
Please be aware that additional admins can also upload and edit resources, add and edit dates as well as change the settings of the group. They can also make the course or group public. So please choose your additional admins or assistants wisely.
Reader Print-on-demand
Please note, that the feature of creating new readers and the print-on-demand service for readers, that have already been created, has been discontinued on 31 March 2015. All other features will remain unchanged for the time being.
How do I protect the content of my course?
When you set up a course, you can choose between Open, Closed and Private participation.
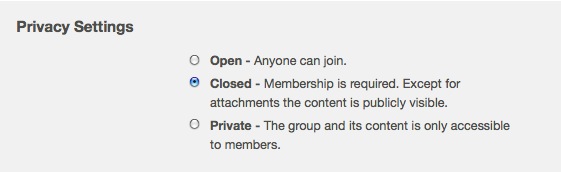
If you choose Open, all iversity users will be able to access your course and the content of your course. This may be a good choice if you are having a lecture series or if your course is part of the Open Courses.
When selecting Closed, you protect the content of your course by creating an invitation code. Dates and discussions can be seen by all iversity users. However, only users who have the invitation code are able to access your course, upload and download resources, or comment on texts and posts.
By setting your course as Private, you hide everything from the public eye, except for the title of the course and the institution where it is taught. Dates, comments as well as uploaded texts and posts can only be accessed by those iversity users who have the invitation code.
How do I create a course?
In the main menu, click on Courses, then select the option Add new.
You will find several text boxes that allow you to specify the details of your course.
If you choose to create the course as a public course, all contents and uploaded documents will be freely accessible. All users of iversity will be able to post and modify entries of the course. Only select this option if no copyrighted material will be uploaded – e.g. in the case of a lecture series.
If your course contains copyrighted resources, please read this.
After having clicked on Create course, please specify the time and place of your course calendar and then complete the course. By specifying the sessions or appointments individually, you make the course structure clear to your students – and all the information they need visualised on the handout. In addition, it allows you to associate resources (essential readings, handouts, presentations) with the respective sessions.
How do I create a research group?
In the main menu, click on Groups. Now select the option Add new and then Research group.
You will find several text boxes that allow you to specify the details of your research group. This way, you have the possibility to introduce your group comprehensively. At the same time, by adding information here, it will be easier for other interested researchers to find your group on iversity.
For how to restrict access to your research group, please read this.
After you have added the research group, you can directly invite members by entering their e-mail addresses into the respective window. You can also attach a personal message, which will automatically contain the invitation code.
You may also wish to connect your group to other projects on iversity. Research groups can be linked to courses, work groups, or project groups at any time.
The next step for iversity:
free Open Courses
Check out our Open Courses and see how iversity can be used to make educational resources interactive, collaborative and social.
iversity.org
Do you need help?
Don't hesitate to contact us via Skype: